Advanced features
AI chat assistant
set-up
TeXstudio offers an interface for AI chat assistant. It supports Mistral AI, ChatGPT or local language models as AI provider. The communication to those servers is done using the official API which incur costs (except for local models). The user must set up an account and enter payment information. The cost is based on the number of words (tokens) in the question and answer, please refer the ai provider for details.
Warning
Using an AI assistant means both questions and selected text is sent to that provider !
Once an account is registered, an “API key” is provided which needs to be entered into TeXstudio configuration. There also the AI provider needs to be chosen as well as the desired ai model. The button “Retrieve list of models” downloads a current list of available models from the ai provider. An API key needs to be present for this to work.
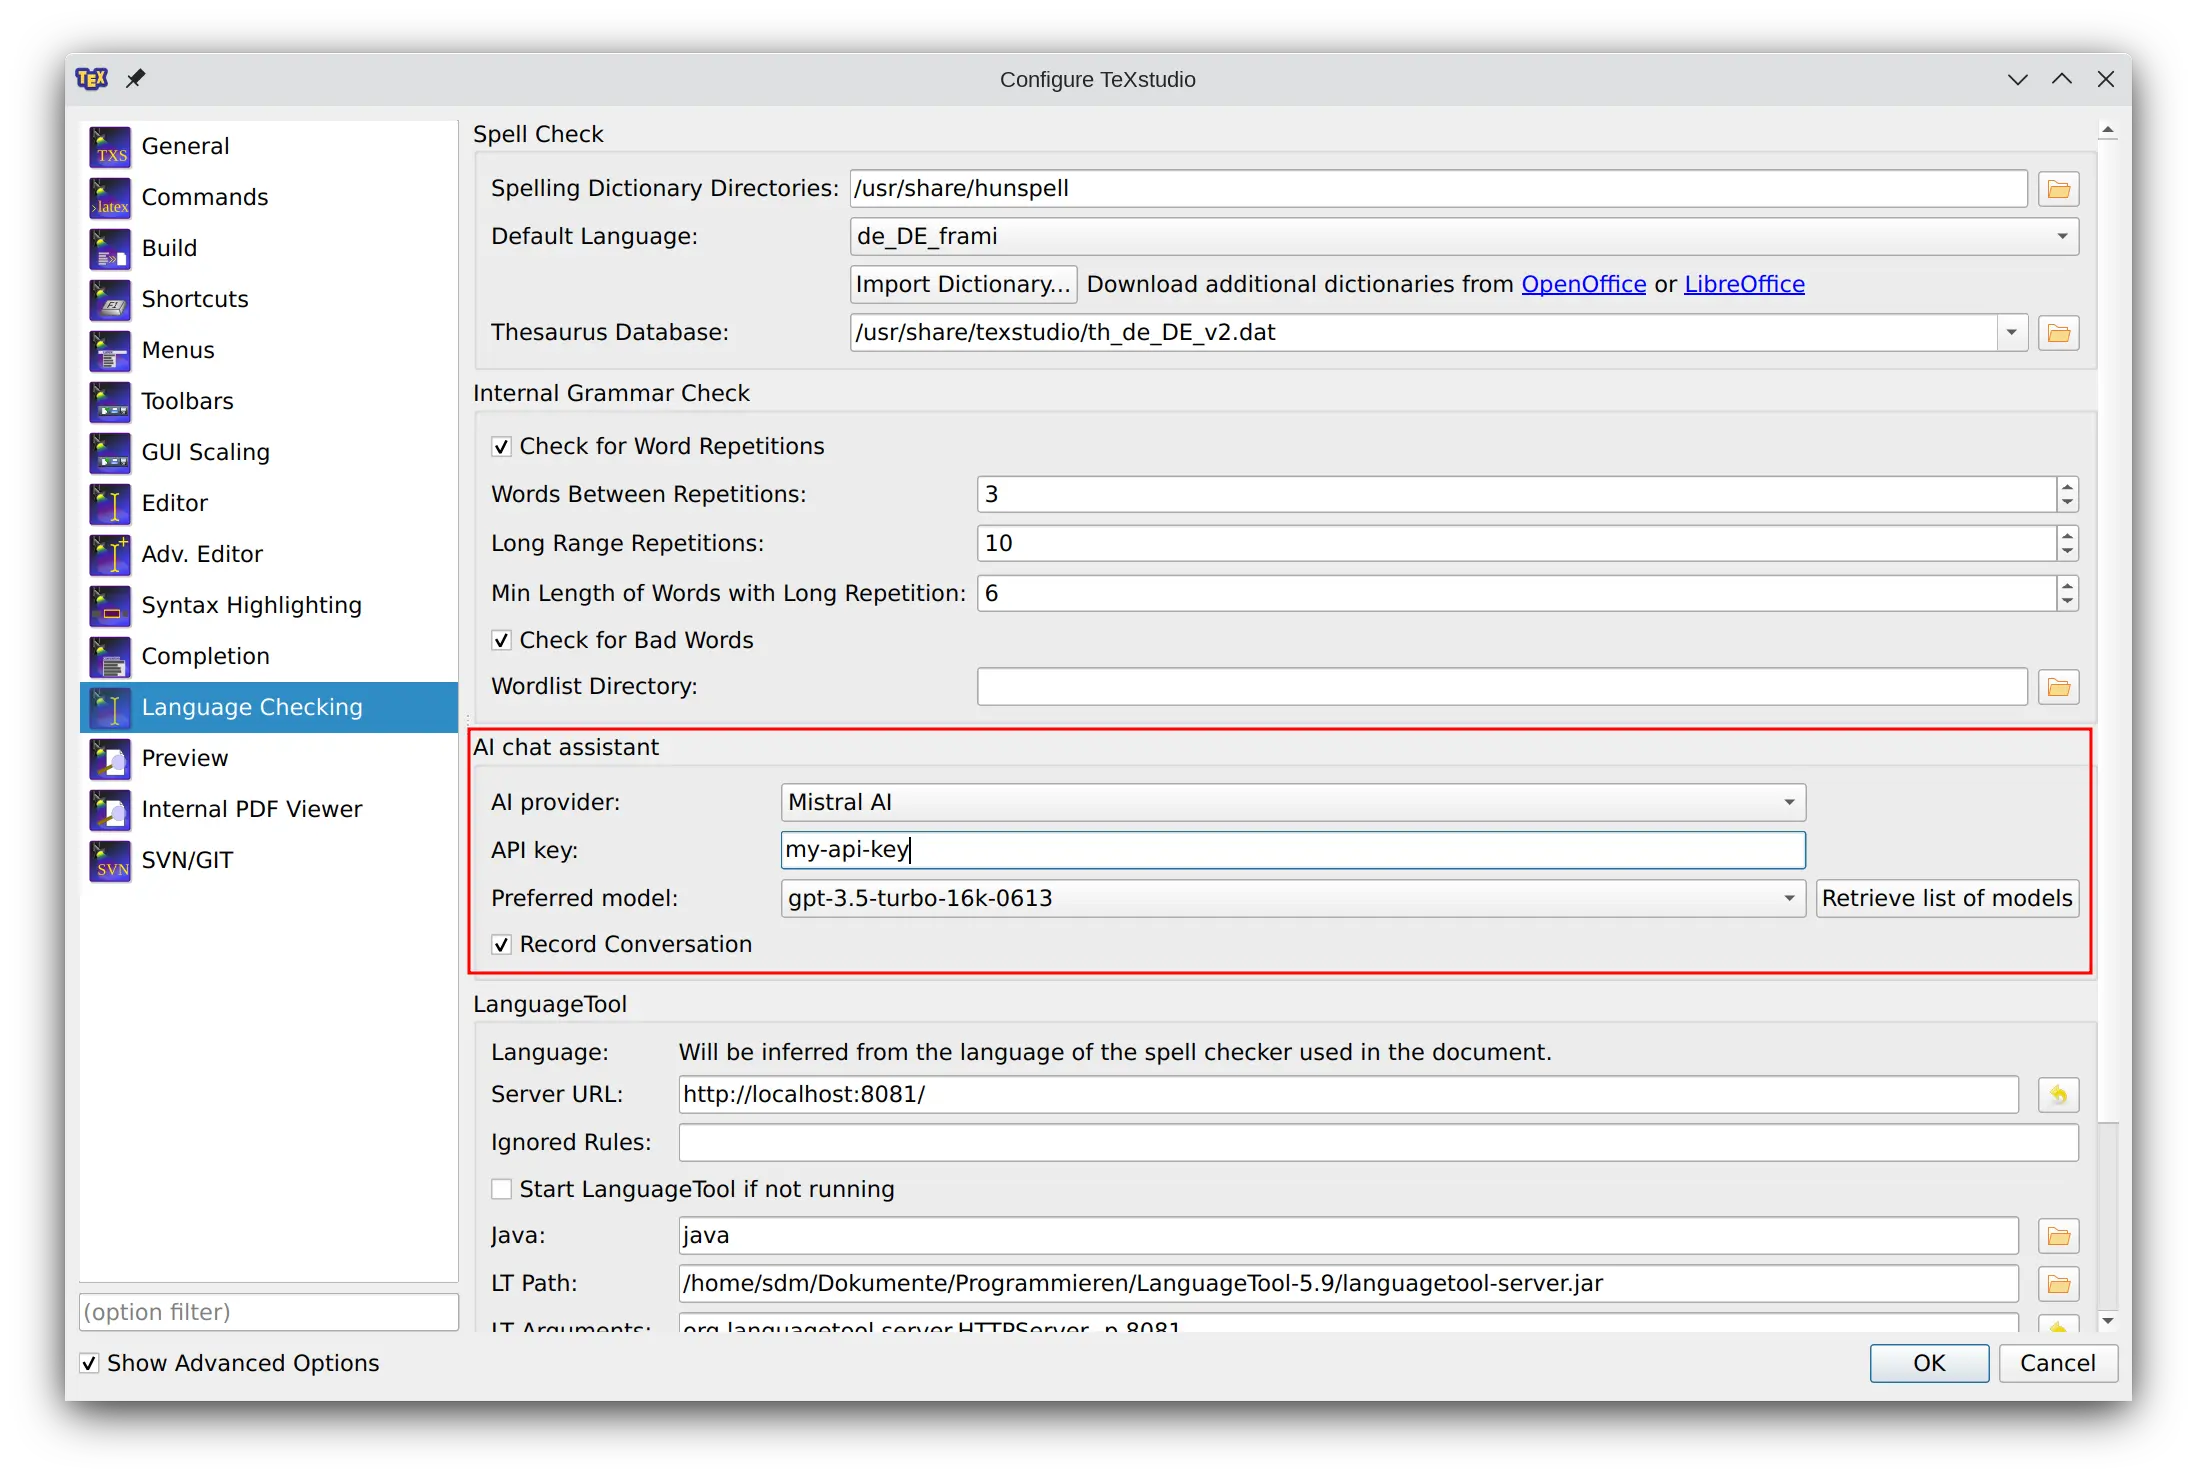
The conversation is stored on disk, so that results can be reused later on. This can be disabled.
Local models can easily be set up via llamafile. Please refer their help for details. TeXstudio expects the OpenAI API interface on 127.0.0.1:8080 to work which is the default for llamafile, hence the llamafile needs to be started manually next to TeXstudio. Local models do not leak information to providers. A powerful GPU is recommended to get reasonable response times.
By default, the system prompt is text:'''%txsSelectedText%'''
%txsSelectedText% will be replaced by txs by the actual selected text in the editor before sending it to the AI provider.
The system prompt can be tweaked to deliver better results, however the construct text:'''%txsSelectedText%''' should be kept in the system prompt, otherwise the selected text is unknown to the AI.
Usage
The ai chat assistant is called via the menu “Wizards/AI chat…”.
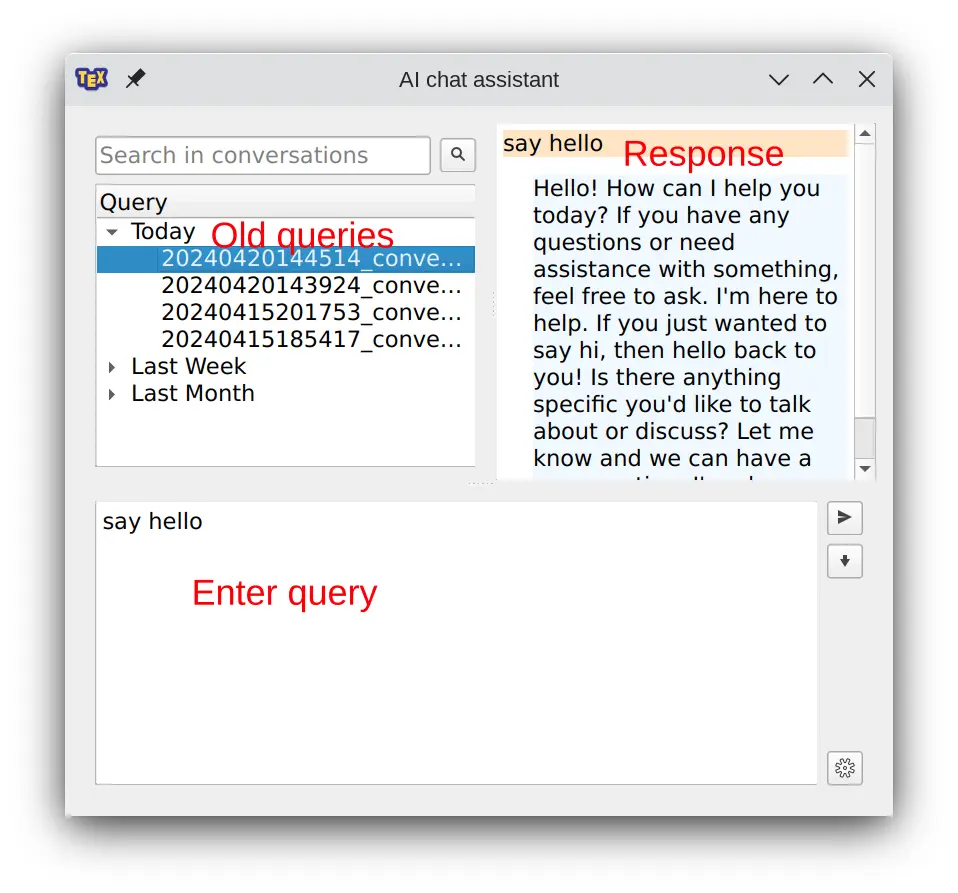
The wizard is split in three parts. The lower half allows entering queries which will be sent to the ai provider by pressing “send”. The responses are shown in the upper right widget which presents the whole conversation which may consist of more than one question/answer. The upper left part gives access to old conversation in order to repeat or reuse questions or answers.
The “insert” button only inserts the last answer into the current editor. If explicit latex-code is given in the answer, only the latex-code is inserted and thereof also only the part between \begin{document} and \end{document} as the tools tend to answer with complete documents which contain the relevant code like tables, etc.
If a TeXstudio-macro is detected, TeXstudio offers to execute that code directly.
Examples
Manipulating texts
TeXstudio predefines selected text as “text”. Queries can refer to that text (as text) directly and receive any transformed results.
E.g.
Selected text: TeXstudio is a highly popular and powerful cross-platform open-source LaTeX editor, widely used by academics, researchers, and professionals for creating complex mathematical and scientific documents. Its user-friendly interface and rich features make it an ideal choice for both beginners and advanced LaTeX users.
Query: Extend the text
Result (mistral.ai/open-mistral-7b): TeXstudio is a highly popular and powerful cross-platform open-source LaTeX editor, widely used by academics, researchers, and professionals for creating complex mathematical and scientific documents. Its user-friendly interface, which includes features such as a spell checker, code completion, and a built-in document viewer, makes it an approachable choice for beginners. For more advanced LaTeX users, TeXstudio offers additional functionality such as a built-in compiler, project management tools, and support for various external packages. TeXstudio is also customizable, allowing users to tailor the editor to their specific needs and preferences. Overall, TeXstudio is a versatile and feature-rich tool that is well-suited for creating professional-level LaTeX documents.
Similarly request like summarize the text,shorten the text should work well.
Generating LaTeX code
The assistant should provide an easy way to answer general LaTeX questions tailored to the real current situation.
E.g.
Query: “Generate a latex table with 4 rows and 3 columns.”
Result (mistral.ai/open-mistral-7b): To create a LaTeX table with 5 rows and 3 columns, you can use the following code as a starting point:
\documentclass{article}
\usepackage{tabularx} % For fixed width columns

\begin{document}

\begin{table}[h]
\centering
\begin{tabularx}{\textwidth}{|X|X|X|} % Set width of table to textwidth
% X is used for columns that adjust width to content

% Table header
\hline
Column 1 & Column 2 & Column 3 \\
\hline
% Table content
Row 1, Column 1 & Row 1, Column 2 & Row 1, Column 3 \\
Row 2, Column 1 & Row 2, Column 2 & Row 2, Column 3 \\
Row 3, Column 1 & Row 3, Column 2 & Row 3, Column 3 \\
Row 4, Column 1 & Row 4, Column 2 & Row 4, Column 3 \\
Row 5, Column 1 & Row 5, Column 2 & Row 5, Column 3 \\

% Table footer
\hline
\end{tabularx}
\caption{Your table caption}
\label{table:your_label}
\end{table}

\end{document}
Replace Column 1, Column 2, Column 3, Row 1, Column 1, etc., with your actual content. The tabularx package is used here to ensure that the table fits within the text width, and the X column type is used to allow columns to expand and fill the available space. Update the caption, label, and table width as needed.
TeXstudio only inserts the part between begin/end document which is what you likely want. Please be aware that packages which are used in the result but not set in your document are not automatically included in your document.
Warning
The quality of the result may be not as expected and AI models do have the tendency to hallucinate, i.e. they invent code which is not working at all. Specifying what you want in more details may help to get what you want.
Wizards in TeXstudio are tailored for generating LaTeX code. The results are reproducible, faster and cheaper, so it is usually preferable to use these first.
Macro generation
The ai chat assistant can generate complete TeXstudio macros (scripts) which can solve specific problems. Here the result quality varies a lot and non-working code is generated often, less so with newer, larger models.
E.g.
Query: Write a macro for texstudio which converts the first letter of every word in a text-selection to uppercase.
The results have been disappointing with mistral.ai, though it was possible to get better results in the chat on the internet. The assumption is that this may get better (or better queries are needed).
Sessions
TeXstudio uses “Sessions” to store and restore the set-up of open documents. Session are stored as .txss2 files. By default, the session is stored when exiting from TeXstudio and restored at start-up.

User Fold Marker
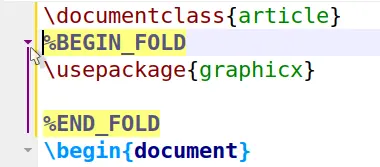
Normally every structure command marks a start of foldable range, and every environment or TeX group constructs a foldable range. You can mark an extra foldable range by inserting special comments %BEGIN_FOLD and %END_FOLD.
Bibliography
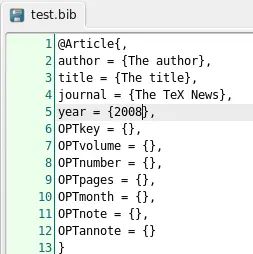
For the “bib” files , the “Bibliography” menu enables you to directly insert the entries corresponding to the standard types of document.
Note
The optional fields can be automatically deleted with the “Clean” command of the “Bibliography” menu.
Specialized bibliography programs like JabRef allow a more comfortable management of bibliography references. It can also be set up to insert bibIDs directly into TeXstudio.
GIT/SVN Support
TeXstudio provides some basic support for version control management with git or subversion (svn).
Once set up, saving the document will also generate a check-in.
This is only the case with explicit saves via “File/Save” (or the shortcut CTRL+S), saving via a compile run is not checked in. This allows tweaking the document around compilation runs without overflowing the version management.
Newly saved documents are automatically added to an existing repository, if no repository exist, a new one will be generated at the directory level of the document.
Note
You cannot checkout/clone a repository via TeXstudio. Just use the normal tools for this. Once you have a working copy, TeXstudio can operate on it.
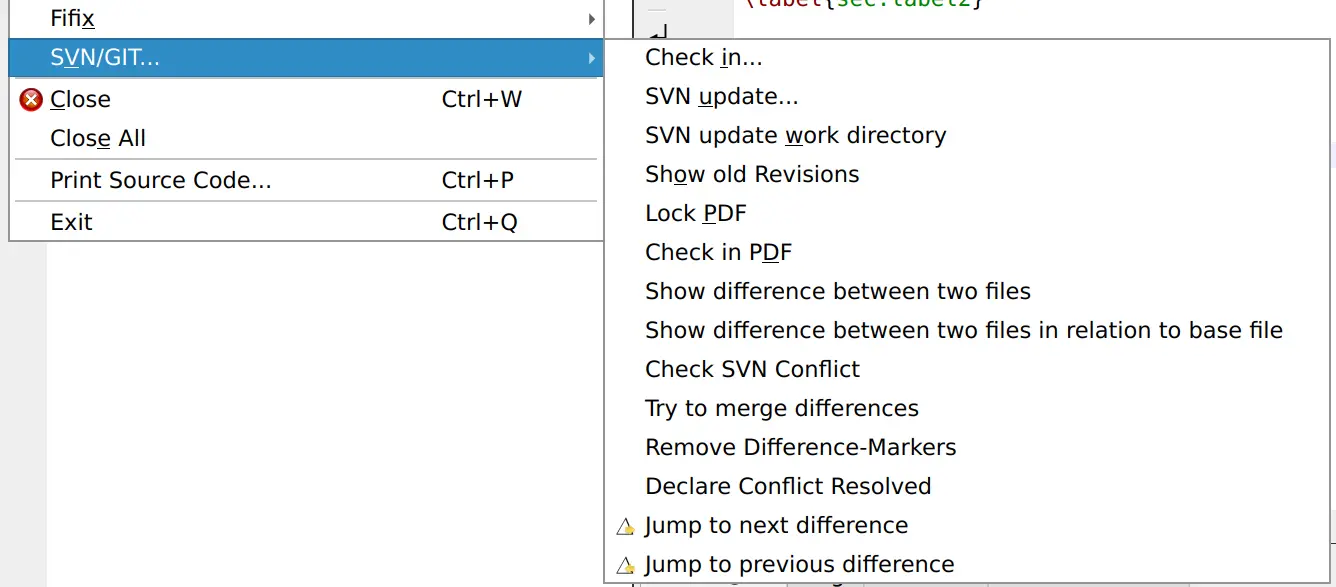
- “File/Checkin”
Performs an explicit save and check in, with an input dialog which asks for a checkin in message which is stored in the SVN/GIT history.
- “File/Show old Revisions”
Pops up a dialog, which shows all available revisions. A selection of an older revision leads to instantaneous change of the current document to that older revision. You can select and copy old parts to transfer them to the most recent version of your document, by copying the parts and then going back to most recent version. If you start editing that document directly, the dialog is closed and the present text will be your new most recent version though yet unsaved.
- Lock PDF/Checkin PDF
allows to check in resulting pdf documents into the repository. SVN may lock the pdf from being changed by anyone else.
- Show difference …
shows diffs of two or three files in the editor. Changes are highlighted.
Advanced header usage
So called “magic comments” are a way to adapt the options of the editor on a per-document level. The concept was originally introduced in TeXshop and has been adopted in a number of editors since. TeXstudio supports the following magic comments:
% !TeX spellcheck = de_DEDefines the language used for spell checking of the document. This overrides the global spellchecking settings. Nevertheless, an appropriate dictionary has to be installed.
If no spellchecking is desired, set value to “none”.
% !TeX encoding = utf8Defines the character encoding of a document.
% !TeX root = filenameDefines the root document for this file (i.e. the file which will be passed to the LaTeX compiler when building). This setting override the automatic root detection in TeXstudio. In turn, it’s overridden, if an explicit root document is set at
Options -> Root Document.% !TeX program = pdflatexDefines the compiler to be used for the document. To be precise, it overrides the default compiler (command
txs:///compile) which is used in the actions “Build & View” as well as “Compile”. Valid options are “latex”, “pdflatex”, “xelatex”, “lualatex” and “usern” (e.g. user0 as user defined command 0)% !TeX TXS-program:bibliography = txs:///biberThis is a TeXstudio-specific setting. It overrides the build-system command specified to the left by the one on the right. In the example, we tell TXS to use the biber command (
txs:///biber) for the general “Bibliography command” (txs:///bibliography). See also the description of the build system.Example:
% !TeX TXS-program:compile = txs:///pdflatex/{-synctex}This will run pdflatex as defined in the option without the
-synctex=1options, see description of the build system.% !TeX TXS-SCRIPT = nameThis defines a temporary script macro .
Example:
% !TeX TXS-SCRIPT = foobar
% //Trigger = ?load-this-file
% app.load("/tmp/test/test.tex");
% app.load("/tmp/test/a.tex");
% TXS-SCRIPT-END
This defines a temporary script macro which is executed, when the file is loaded, and which in turns loads the two files in /tmp/test.
The macros defined via TXS-SCRIPT are active in all files of a document (e.g. included files). You cannot run them manually. They are run via the trigger (regular expression or special trigger, see section on triggers). The macro is just read once, when the file is opened. Changes during an edit session will only take effect when you reopen the file.
% !BIB program = biberThe special
% !BIB programcommand is understood for compatibility with TeXShop and TeXWorks (also in the variant% !BIB TS-program). This is equivalent to% !TeX TXS-program:bibliography = txs:///biber
Local packages
Many users define personal commands, settings, colors, etc in a personal file which is included into the latex document via \include or \input.
TeXstudio can read the files and take up the defined commands for completion but is does not have any understanding of the arguments like if they are labels, texts or math elements.
The syntactical definition is given to TeXstudio via cwl files.
TeXstudio searches for local cwl files for local packages. To notify TeXstudio that a package is local, the package name has to be given as a relative path, e.g. \usepackage{./myPackage}.
TeXstudio looks for ./myPackage.cwl and loads it if present.
Note
The local package filename needs to be myPackage.sty.
Otherwise all normal commands are valid.
If a cwl file is changed, the updated version is only loaded into TeXstudio after a restart of TeXstudio.
Personal macros
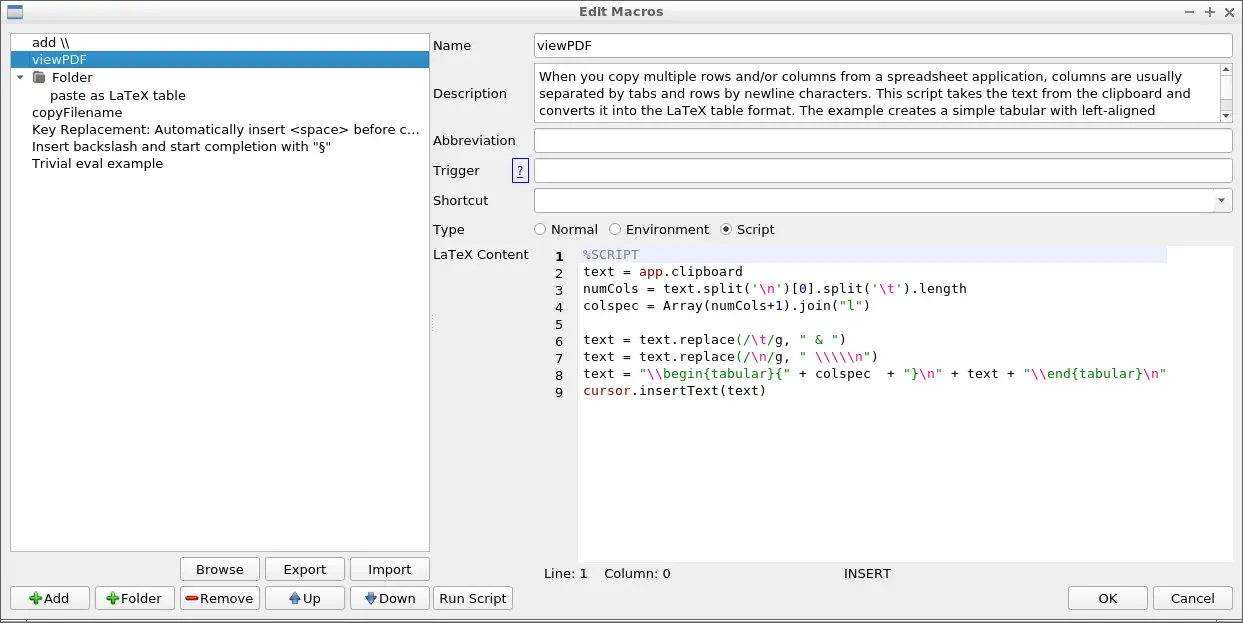
TeXstudio allows you to insert your own macros. These macros are defined with the “Macros - Edit Macros” menu. Macros can consist of simple text which is directly placed into txs (use type “Normal”). It can also be an “environment” which are automatically extended by begin/end or it can be a java script. The needed macro type can be selected by radio buttons “Normal”, “Environment”, or “Script”.
The “abbreviation” is a pseudo-command for the latex completer. If the pseudo-command is completed, the macro will be inserted instead. Note that the pseudo-command needs to start with a backslash (”\”).
“Trigger” is a regular expression which triggers the inclusion of the macro: When the last written characters match this expression, they are removed and the macro is inserted/executed. (see below for more details).
Some macros can be directly downloaded from an internet repository. The dialog is started with the button “Browse”. For easier data exchange, macros can be im- and exported to a file. If you want to add a macro of your own to that repository, you can hand it in as a feature request on Github. Each macro can be assigned a fixed shortcut in the “Shortcut” box. The list of macros on the left-hand side represents the macro ordering in the macro-menu. It is rearranged with the “up”/”down”/”add”/”remove” buttons or with drag and drop. Folders can be added to sort a larger number of macros sensibly. To move macros into/from folders, only drag and drop works. The “Exec Macro” button executes the macro immediately.
Text macros
Apart from normal text, some special codes are recognized and replaced on insertion.
If you write %| somewhere the cursor will be placed at that place in the inserted text. (A second %| will select everything between them).
Write %<something%> to mark it as placeholder which is highlighted in the text and can be selected by
Ctrl+Left/Right. Additional properties of the placeholder can be set after a %:, e.g. %<something%:persistent,id:123,mirror%>. The available properties are:select: The placeholder will be selected (similar to %|)
multiline: The placeholder is used for multiline text. If a macro insertion replaces an existing text, the replaced text is again inserted into a placeholder in the macro. If the original text spans more than one line, it will be inserted into a placeholder with the multiline property. Otherwise in a placeholder with the select-property.
persistent: The placeholder is not automatically removed, when its text is changed in the editor
mirror: The placeholder is a mirror of another placeholder in the macro and thus will always have the same content as the original placeholder. You should set an id, so it knows which placeholders are connected
id:123: The id of the placeholder
columnShift:-12: The placeholder is not placed where the %< markers are, but some columns to the left of it
translatable: The text of the placeholder should be added to translations (only applicable to macros that are known during the compilation of texstudio).
cutInsert: The text of the placeholder is replaced by cut buffer (selected text when the snippet is inserted). This code is only necessary if not the first placeholder is intended to take the cut buffer, e.g. generate env (ctrl+e).
The option %(filefilter%) will be replaced by a filename which is asked for in a file dialog. The file filter is the standard Qt-Filefilterformat. For example “Images (*.webp *.xpm *.jpg);;Text files (*.txt);;XML files (*.xml)”, see also Qt-Doc
Environment macros
The text must consist of one word and no newline. The word will be used as environment-name, thus “environment” will be inserted as:
\begin{environment}

\end{environment}
AI queries
These queries are sent to the ai chat assistant, see here. This allows to regular use standard request like shorten text.
The query is directly executed, the result is shown on the chat assistant dialog, so that the user can decide to use or ignore it.
Script Macros
Instead of using code snippets, you can also make use of scripting with QJS, an application scripting language based on ECMAScript.
Select radio button “Script” to declare a macro as a script. Here are the objects that provide the interface to the TeXstudio internals:
“editor” allows some top level operations like searching/save/load. in the current document
“cursor” gives access to cursor operations like moving, inserting and deleting texts.
“fileChooser” gives access to the filechooser dialog, a very simple file selection dialog
“app” to access application wide things like the clipboard or the menus
The following table gives an overview on the provided commands.
Command |
Description |
|---|---|
alert(str), information(str), warning(str) or critical(str) |
shows str in a messagebox with a certain icon |
confirm(str) or confirmWarning(str) |
shows str as a yes/no question in a messagebox |
debug(str) |
prints str to stdout |
writeFile(name, value) |
Writes value to file name (requires write privileges) |
readFile(name) |
Reads the entire file name (requires read privileges) |
system(cmd, workingDirectory=””) |
Calls an external command cmd, which includes the program name and its arguments. |
|
Unsuppoted since txs 4.x. Sets a temporary, global variable |
|
Unsuppoted since txs 4.x. Reads a global variable |
|
Unsuppoted since txs 4.x. Checks for the existence of a global variable |
setPersistent(name, value) |
Sets a global configuration variable. (can change the values of the ini file, requires write privileges) |
getPersistent(name) |
Reads a global configuration variable. (can read all values of the ini file, requires read privileges) |
hasPersistent(name) |
Checks if a global configuration variable exists. (requires read privileges) |
hasReadPrivileges() |
Checks if the script has read privileges |
hasWritePrivileges() |
Checks if the script has write privileges |
registerAsBackgroundScript([id]) |
Allows the script to run in the background (necessary iff the script should handle events/signals) |
triggerMatches |
Matches of the regular trigger expression, if the script was called by an editor trigger. |
triggerId |
Numeric id of the trigger, if the script was called by an event trigger. |
|
Unsuppoted since txs 4.x. Includes another script. Can be a filename or the name of a macro. |
pdfs |
List of all open, internal pdf viewers . |
editor.search(searchFor, [options], [scope], [callback]) |
Searches something in the editor. |
editor.replace(searchFor, [options], [scope], [replaceWith]) |
This function searches and replaces something in the editor. It behaves like editor.search apart from the replaceWith argument which can be a simple string or a callback function. If it is a function the return value of replaceWith is used to replace the match described by the cursor passed to replaceWith. |
editor.replaceSelectedText(newText, [options]) |
This function replaces the current selections with newText or inserts newText, if nothing is selected. If newText is a function, it will be called with the selected text and corresponding cursor, and the return value will be the newText. It is recommended to use this function for all text replacements/insertions, since it is the easiest way to handle multiple cursors/block selections correctly. |
editor.insertSnippet(text); |
Inserts a text snippet into the editor. For a list of extended features and syntax see Text Macros. |
editor.undo(); |
undo last command in editor |
editor.redo(); |
redo last command in editor |
editor.cut(); |
cut selection to clipboard |
editor.copy(); |
copy selection to clipboard |
editor.paste(); |
paste clipboard contents |
editor.selectAll(); |
select all |
editor.selectNothing(); |
select nothing (clear selections) |
editor.cutBuffer |
If a macro was triggered by a key press and there was a selection previous to the key press, the content of the selection is stored in the cutBuffer. The selection and its content is removed before the macro is entered. |
editor.find(); |
activate “find panel” |
editor.find(QString text, bool highlight, bool regex, bool word=false,bool caseSensitive=false); |
activate “find panel” with predefined values |
editor.find(QString text, bool highlight, bool regex, bool word, bool caseSensitive, bool fromCursor, bool selection); |
activate “find panel” with predefined values |
editor.findNext(); |
find next |
editor.replacePanel(); |
replace (if find panel open and something is selected) |
editor.gotoLine(); |
activate “goto line panel” |
editor.indentSelection(); |
indent selection |
editor.unindentSelection(); |
unindent selection |
editor.commentSelection(); |
comment selection |
editor.uncommentSelection(); |
uncomment selection |
editor.clearPlaceHolders(); |
clear place holders |
editor.nextPlaceHolder(); |
jump to next place holder |
editor.previousPlaceHolder() |
jump to previous place holder |
editor.setPlaceHolder(int i, bool selectCursors=true); |
set Placeholder |
editor.setFileName(f); |
set filename to f |
editor.write(str) |
inserts str at the current cursors position (if there are cursor mirrors, str will be inserted by all of them) |
editor.insertText(str) |
inserts str at the current cursor position (cursor mirrors are ignored,so it is preferable to use replaceSelectedText or write instead) |
editor.setText(text) |
replace the whole text of the current document by text |
editor.text() |
return the text of the complete document |
editor.text(int line) |
return text of line |
editor.getLineTokens(lineNr) |
Returns an array of parser tokens for a given zero-based line number. Each token is an object with the following properties: |
editor.document().lineCount() |
Returns the number of lines |
editor.document().visualLineCount() |
Returns the number of visual lines (counting wrapped lines) |
|
Unsupported in txs 4.x. Use new QDocumentCursor(…) instead, see section cursor. |
editor.document().text([removeTrailing = false], [preserveIndent = true]) |
Returns the complete text of the document |
editor.document().textLines() |
Returns an array of all text lines |
editor.document().lineEndingString() |
Returns a string containing the ending of a line (\n or \n\r) |
|
Unsupported in txs 4.x. |
editor.document().canUndo() |
Returns true if undo is possible |
editor.document().canRedo() |
Returns true if redo is possible |
editor.document().expand(lineNr) |
Unfold the line in editor |
editor.document().collapse(lineNr) |
Fold the line in editor |
editor.document().expandParents(lineNr) |
Expand all parents of the line until it is visible |
editor.document().foldBlockAt(bool unFold, lineNr); |
Collapses or expands the first block before lineNr |
editor.document().getMasterDocument(); |
Returns the open document which directly includes this document |
|
Deprecated: Use getRootDocument() instead |
editor.document().getRootDocument(); |
Returns the open document which indireclty includes this document and is not itself included by any other document |
editor.document().getMagicComment(name); |
Returns the content of a magic comment, if it exists |
editor.document().updateMagicComment(name, value, [create = false]); |
Changes a magic comment |
editor.document().labelItems/refItems/bibItems |
Returns the ids of all labels/references or included bibliography files. |
editor.document().getLastEnvName(lineNr) |
Returns the name of the current environment (at the end of the line). |
documentManager.currentDocument |
Current document (usually the same as editor.document(), unless the script is running in background mode) |
documents.masterDocument |
Master document if defined |
[documentManager.]documents |
Array of all open documents |
documentManager.findDocument(fileName) |
Returns the open document with a certain file name |
documentManager.singleMode() |
Returns true if there is no explicit master document |
|
Deprecated: Use getRootDocumentForDoc(document) instead |
documentManager. getRootDocumentForDoc(document) |
Returns the open document (possibly indirectly) including the given document |
documentManager.findFileFromBibId(id) |
Returns the file name of the bib file containing an entry with the given id |
new QDocumentCursor(editor.document(),line, [column = 0], [lineTo = -1], [columnTo = length of lineTo]) |
Returns a cursor object. If lineTo is given the cursor has a selection from line:column to lineTo:columnTo, otherwise not. |
cursor.atEnd() |
returns whether the cursor is at the end of the document |
cursor.atStart() |
returns whether the cursor is at the start of the document |
cursor.atBlockEnd() |
returns whether the cursor is at the end of a block |
cursor.atBlockStart() |
returns whether the cursor is at the start of a block |
cursor.atLineEnd() |
returns whether the cursor is at the end of a line |
cursor.atLineStart() |
returns whether the cursor is at the start of a line |
cursor.hasSelection() |
return whether the cursor has a selection |
cursor.lineNumber() |
returns the line number of the cursor |
cursor.columnNumber() |
returns the column of the cursor |
cursor.anchorLineNumber() |
returns the line number of the anchor. |
cursor.anchorColumnNumber() |
returns the column of the anchor. |
cursor.shift(int offset) |
Shift cursor position (text column) by a number of columns (characters) |
cursor.setPosition(int pos, MoveMode m = MoveAnchor) |
set the cursor position after pos-characters counted from document start (very slow) |
cursor.movePosition(int offset, MoveOperation op = NextCharacter, MoveMode m = MoveAnchor); |
move cursor offset times. MoveOperations may be: |
cursor.moveTo(int line, int column); |
move cursor to line and column |
cursor.eraseLine(); |
remove current line |
cursor.insertLine(bool keepAnchor = false); |
insert empty line |
cursor.insertText(text, bool keepAnchor = false) |
insert text text at cursor (this function will ignore indentations and mirrors, see editor.write and editor.insertText) |
cursor.selectedText() |
return the selected text |
cursor.clearSelection(); |
clears selection |
cursor.removeSelectedText(); |
removes selected text |
cursor.replaceSelectedText(text); |
replace selected text with text |
cursor.deleteChar(); |
removes char right to the cursor |
cursor.deletePreviousChar(); |
removes char left to the cursor |
cursor.beginEditBlock(); |
begins a new edit block. All cursor operations encapsulated in an edit block are undone/redone at once. |
cursor.endEditBlock(); |
ends an edit block |
app.getVersion() |
Current version (0xMMmm00) |
app.clipboard |
Property to read/write to the clipboard |
app.getCurrentFileName() |
File name of currently edited file |
app.getAbsoluteFilePath(rel, ext = “”) |
Converts a relative filename to an absolute one |
app.load(file) |
Loads a file |
app.fileOpen/Save/Close/…/editUndo/…/QuickBuild/… |
All menu commands (i.e. all slots in the texstudio.h file). You can view a list of all currently existing slots on the “menu” page of the config dialog. |
app.completerIsVisible() |
check if completer is visible. |
app.newManagedMenu([parent menu,] id, caption) |
Creates a new menu and returns it |
app.getManagedMenu(id) |
Returns a QMenu with a certain id |
app.newManagedAction(menu, id, caption) |
Creates a new action and returns it |
app.getManagedAction([id]) |
Returns a QAction with a certain id (all ids have the form main/menu1/menu2/…/menuN/action, with usually one menu, e.g. “main/edit/undo”, see texstudio.cpp) |
app.loadManagedMenu(filename) |
load menu structure from an xml-file, same format as uiconfig.xml |
app.setupToolBars() |
recreate toolbars. Call this if a newly created menu is used in the toolbar. |
app.createUI(file, [parent]) |
Loads a certain ui file and creates a QWidget* from it |
app.createUIFromString(string, [parent]) |
Creates a QWidget* described in the string |
app.slowOperationStarted()/slowOperationEnded() |
Notify txs about the start/end of a slow operation to temporary disable the endless loop detection. |
app.simulateKeyPress(shortcut) |
Trigger a KeyPress event for the given shortcut, e.g. |
app.aiChat(query) |
start the ai chat assistant. If query is not empty, query is executed and the result is shown in the chat assistant, like ai query macros, see macro |
new UniversalInputDialog() |
Creates a new dialog |
dialog.add(defaultValue, [description, [id]]) |
Adds a new variable with the given default value, optional description and id to the dialog; and returns the corresponding qt component. A string default value becomes a QLineEdit, a number a QSpinBox and an array a QComboBox. |
dialog.get(nr/id) |
Returns the current value of the nr-th added variable or the variable with a certain id. |
dialog.getAll() |
Returns the value of all variables as combined numerical/associative array. You can use returnvalue[i] to get the i-th variable, and returnvalue.id to get the variable with a certain id. |
dialog.exec() |
Displays the dialog. Returns 1 if the user accepted the dialog, 0 if it was canceled. |
dialog.show() |
Displays the dialog asynchronously. |
|
Not working in txs 4.0.0. |
fileChooser.exec() |
show dialog and wait until it is closed again |
fileChooser.setDir(dir) |
set directory in the dialog to dir |
fileChooser.setFilter(filter) |
set file filter to filter, using the QT-format, see above |
fileChooser.fileName() |
return selected filename (after exec) |
Some examples:
Copy current file name to clipboard:
%SCRIPT
app.clipboard = editor.fileName();
Execution of editor text:
%SCRIPT
eval(editor.text());
Show all properties of an object:
%SCRIPT
function write_properties(obj) {
    app.fileNew();
    newEditor = documentManager.currentDocument.editorView.editor;   //access the newly created document
    newEditor.setText(Object.getOwnPropertyNames(obj).join("\n"));   //print the properties
}

obj = editor;                                                        //object to show (e.g. the current editor)
write_properties(obj)
Additional action in the edit menu
%SCRIPT
var menu = app.getManagedMenu("main/edit");                   //get edit menu
var act = app.newManagedAction(menu, "script", "scripttest"); //add action
act.triggered.connect(function(){alert("called");});          //register simple handler
registerAsBackgroundScript("test");                           //keep handler valid
Asynchronous dialog:
%SCRIPT
var ui = createUI(" ... path to your ui file ...");  //load dialog
ui.accepted.connect(function(){alert("x");})         //react to dialog closing
registerAsBackgroundScript("abc");                   //keep function valid
ui.show();                                           //show dialog
The dialog is described in an ui file which can be created with the Qt Designer.
More examples can be found in the Wiki.
Triggers
Regular Expressions
In its simplest form, the trigger is simply a text, which is replaced by the macro. E.g. trigger=”eg” macro=”example given”, “eg” in “the leg” is replaced on pressing “g” by “example given”
As the trigger is a regular expression, more elaborate triggers can be created. TXS makes use of look-behind searching: “(?<=\s)%” is used to replace a “%” if the previous character is a space. More help on regular expressions can be found on the internet.
You can access the matched expression in the script via the global
variable triggerMatches. triggerMatches is an array. It’s zero-th
component is the match to the complete regexp. The following elements
are matches to groups (if groups are defined).
Example:
Trigger: #([a-z])
Typed text: #a

triggerMatches[0] == '#a'
triggerMatches[1] == 'a'
Note: Triggers are inactive while the completer is active. For example
you cannot trigger on \\sec if the completer is open suggesting to
complete \section.
Limitation of Scope
To the scope in which a macro will be active, you can prepend an
expression of the pattern (?[scope-type]:...).
Scope Limiting Expression |
Meaning |
|---|---|
|
The macro is only active if the highlighting of the document matches the given languages (comma sepataed list). |
|
Restrict the macro to certain highlighted environments. The possible values correspond to the list on the syntax highlighting config page. |
|
Similar to |
|
Restrict the macro to certain environments. Only the latest environment is checked in case of nested environments. Environments are only detected in the lines between “\begin”/”\end”, excluding the lines that contain those commands! It also checks for aliases, i.e. all math type environments are aliased as “math” as well. “math” is also detected in symbol started mathmode like $…$. |
You may combine (?language:...) and (?highlighted-as:...)
expressions. However, combing (?highlighted-as:...) and
(?not-highlighted-as:...) does not make sense logically and has
undefined behavior.
Note that you still need the regular expression of the trigger itself.
Here’s a full complex example:
(?language:latex)(?highlighted-as:comment,commentTodo)FIXME. This
trigger responds to typing “FIXME”, but only in comments and
todo-notes of latex documents.
Event Triggers
Additionally the following special trigger terms (without parentheses) can be used to execute the script when the corresponding event occurs:
Special Trigger |
Executed on Event |
|---|---|
?txs-start |
TeXstudio is started. |
?new-file |
A new file is created |
?new-from-template |
A new file is created from a template |
?load-file |
A file is loaded |
?load-this-file |
The file containing the macro is loaded (only makes sense, if the script is defined as magic comment) |
?save-file |
A file is saved |
?close-file |
A file is closed |
?master-changed |
A document is un/defined as master document |
?after-typeset |
A latex-like command has ended |
?after-command-run |
A command run has ended (e.g. a compile command that calls latex twice and opens the viewer, will trigger this event once, but after-typeset twice) |
Multiple of these special triggers can be combined by | symbols.
Save/Load Profile
TeXstudio offers the possibility to save/load profile files (.txsprofile). Profile files are complete configuration files, containing all configuration settings. To use it meaningfully for exchanging profiles or settings, the .txsprofile file, which is a text file, should be stripped down to the necessary settings. In case of syntax highlighting, this affects the formats section.
[formats]
data\align-ampersand\bold=true
data\align-ampersand\fontFamily=
data\align-ampersand\foreground=#0055ff
data\align-ampersand\italic=false
data\align-ampersand\overline=false
...
In case of other settings, the setting name is usually similar to the configuration settings name, so guessing should work. The section header for the setting like [formats] or [texmaker] needs to be present before the actual setting.
Example:
[texmaker]
Tools\Commands\latex="latex -src -interaction=nonstopmode %.tex"
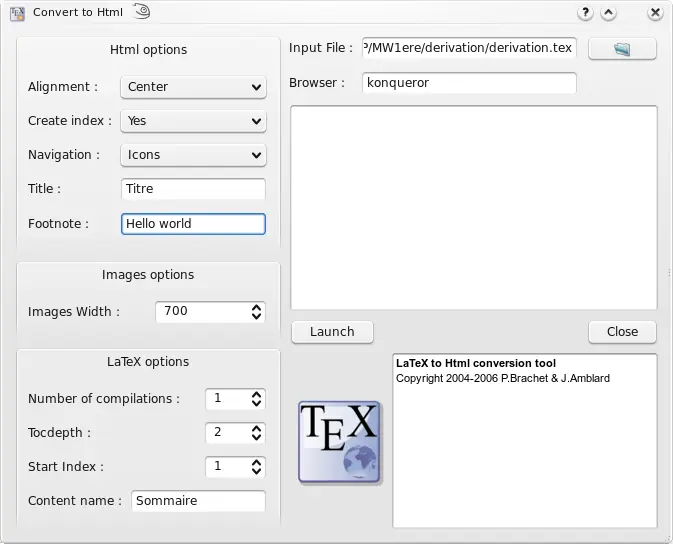
The “Convert to Html” command
This command (from the “Tools” menu ) produces a set of html pages from a LaTeX source file with one image for each html page. Each page in the slide presentation corresponds to one of the postscript pages you would obtain running LaTeX.
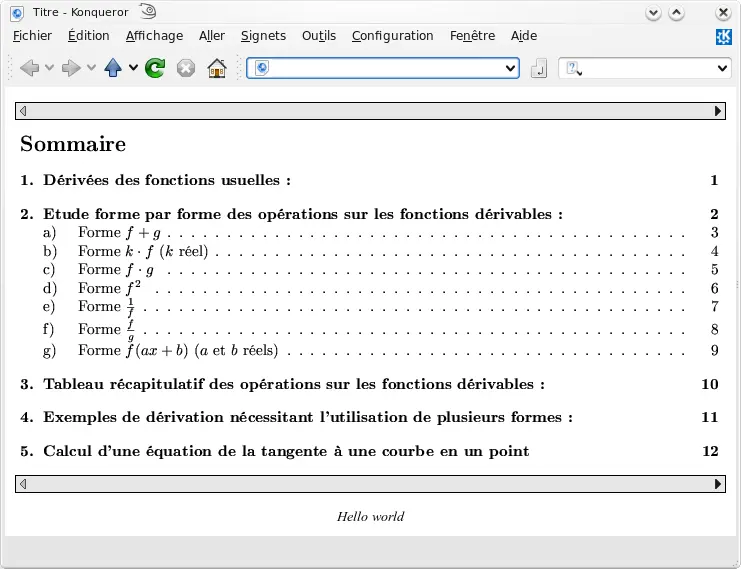
The command also produces an index page corresponding to the table of contents you would obtain with LaTeX. Each item of the index page includes a link to the corresponding html page.
You can create links in the html pages by using the \\ttwplink{}{} command in the tex file.
Synopsis:
\ttwplink{http://www.mylink.com}{my text} (external link)
\ttwplink{page3.html}{my text} (internal link)
\ttwplink{name_of_a_label}{my text} (internal link)
Warning
You can’t use this command with the hyperref package (and some others packages). This command can only be used with the “Convert to html” tool.
